Saturday 4 December 2010

Time for some catching up... but that's not the reason why I'm squeezing 2 breads into one post! As a matter of fact, these could have turned out pretty similar (or even identical)..
In other words, after seeing the result (and observing the problems) of bread no.1, I figured I'd try the same recipe again, slightly varying the parameters and see how that would influence the outcome. This of course is far from being a scientific experiment, because usually when I'm doing bread, it depends of many more factors, such as time of the day or mood.
So, here's what goes into the bread:

400 grams of spelt flour
3 spoons of sugar
2 spoons of yeast
water (for the yeast starting-mix)
honey
Guinness
salt
olive oil
some strong white flour (for working the dough)

After having some success with using Guinness in our bread a while ago (when we still used the bread maker) I really wanted to use it again. In the meantime however I learned that alcohol is making the yeast 'sluggish', so it became clear to me that I cannot substitute water for beer when doing the yeast mix.

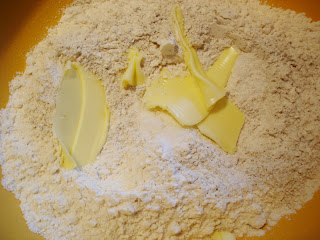
Therefore, while the mixture of yeast, sugar and water was starting to bubble, I was mixing 400 gram of wholemeal spelt with a good helping on Guinness and honey, adding salt and oil. So far so good, but of course when bringing the flour mix and the yeast mix together, I ended up with clearly too much liquid!
So, I worked the dough for a few minutes, adding white flour until I got a familiar bread dough consistency. Let it rest for an hour, worked it quickly into shape and let it rest for 20 minutes while the oven was heating up to 210 degree.

Another 20 minutes and the bread was ready. I must say, it wasn't bad, but it didn't grow as expected and with the extra flour added it became a bit heavy...

Now, we fast forward to the next attempt: Same ingredients, but this time I already started with using less 30% less water for the yeast preparation. I also forgot to add salt, but that wasn't on purpose (I just realized that after working the dough, so I sprinkled it with coarse salt before resting, that's where the white spots come from...) However, the biggest difference probably was that I resisted the temptation of adding more white flour, even though of course the dough was initially too wet again. Instead, I was just kneading it more (probably some 10 minutes more), until I felt confident that it could turn out well. Did I say that I'm an optimist?

After approximately 1 1/2 hour of resting I kneaded it again (more than I would usually do after the resting period), put it on the baking tray and let it rest covered for almost another hour. Then it went into the oven as usual.

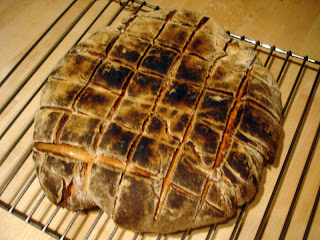
This time, the bread grew much bigger, got a nice crust and a good moisture in general (even after more than a week it didn't turn hard really). It was also surprisingly soft, but it tastes good. Sometimes it's worth trying the same thing again in order to get a better result!

Sunday 28 November 2010

'If they don't have bread, let them eat cake!'
Okay, apparently it wasn't Marie Antoinette who said this, but it still makes a good quote and I thought it would be appropriate as this post isn't about bread...

As I started a tradition of optimistically attempting making incredibly difficult cakes for Ana's birthday by doing a Prinzregententorte last year (took me about 3 1/4 hours), I started searching for suitable recipes this year with 3 key words in mind: Rum, coconut and white chocolate. And yes, I ended up with 3 recipes that I decided would capture the essence of what I was planning. Thought it might work by combining them into one...
First step was doing a kind of cream / mousse for the inter-layer: It involved heating up 1/8 cup of water with 1/3 cup of sugar and melt 50 grams of white chocolate. When everything turns into a smooth cream, leave to cool and then put it to chill. Note to myself: Try to translate cups into 'proper' measures before starting to bake. 'Cups' are for Americans only... Another note: I used half of the measures that the recipe stated, as I didn't want to do a dessert for 6 people. So it gets twice as difficult to get the balance of ingredients right. It's best to use as little water as possible!
None of the recipes I used was for making a layered cake, but I kind of like layering. Maybe because it makes things unnecessarily complicated. Anyway, while the cream / mousse was chilling, I did the cake's layers, I then finished the mouse while the second layer was in the oven. Here's what needs to be done to finish the interlayer material: Beat half a cup of whipping cream and some vanilla extract (so it becomes whipped cream) and fold the chocolate mix under. In my case it turned out to be more of a cream, use less water (as mentioned earlier) and the result would probably be more fluffy. Will try next time!
So, on with the layers:
I started with mixing 100 grams of white flour with baking powder and baking soda. Separately, I mixed then 100 grams of sugar and 50 grams of butter with 2 eggs, 100 ml of plain yoghurt, vanilla extract and a good shot of rum. Then I combined the two parts and mixed approximately 100 grams of coconut cream (which I heated up earlier, so that it was indeed a cream rather than scrapes from a block, in pretty much the same way I'd melt it for doing a thai curry...)
This then went into a buttered and floured spring form and into the oven at 180 degree for 50 minutes. The usual 'bake till it's golden and a blade stabbing the cake comes out clean' rule applies!
I think this bottom layer turned out quite nice (but for some reason I felt I had to slice it into 2 layers... this is not really necessary!). I put it on a large plate and turned my attention to layer no.2 (or no.3 in my case).Here I experimented a little: It's largely similar to the first part (used slightly less yoghurt, because I didn't have more. Note to myself: Buy more yoghurt next time, or possibly a big pot of buttermilk). I didn't melt the coconut cream this time and I used about 50 grams of coconut and 50 grams of white chocolate, both grated. Maybe melting the chocolate and the coconut and adding 50 grams of dessicated coconut flakes might be better. I also think that it could be interesting to vary the texture of the upper layer slightly by separating the eggs and whisk the egg whites stiff, just to fold them under in the end. Didn't do it this time, but hey! This cake's a prototype, there's always room for improvement!
Alright, from now on it's fairly easy: Spread the interlayer cream (or mousse) on the bottom layer, put the top layer over it. Melt white chocolate with butter for the icing and pour it over the cake carefully. Done! Happy Birthday, Ana. Let's enjoy the cake...


Sunday 31 October 2010

Today's baking day again, as last week's bread is coming to an end... hold on, which bread? Indeed, I have to admit we're running a bit late, so let's try some catching up. I should not mention that there was a particularly good bread before the one that I'm reporting about now...
So, before getting ready doing the bread for the coming week, let's have a look at last week's White Rustic Boomerang. I'm still chasing the idea of having a proper rustic white bread with a good crust outside and a light, open structure inside. I know, I could do some research and follow a recipe, but my nature of achieving certain results is usually by trial & error. You could also call me a stubborn donkey!
The approach of the day was called 'pre-dough'. I made my usual yeast-mix (3 spoons of dry yeast, 2 spoons of sugar, 100ml of water and 50ml of boiling water) and mixed it with 200 grams of strong white flour, kneaded it and but it to rest not just for 1 hour but for a whole day. Of course, I put it in a warm place and covered with a wet cloth.


Now this is how it looked like after coming out of the cupboard... it did grow, which is nice. But it also developed a thick hard 'skin', which is less nice. But, I needed to continue with what I had, so I added 200 grams more flour, some salt (not enough) and some water in a desperate attempt of getting a nice smooth dough. After some serious kneading I was almost there...
Oh well! All there was to do is getting it into shape (no, it's not a half-moon shape, it's a baguette shape bent to fit into the oven), make some cuts and add a bit of herbs: olive salt, thyme and rosemary. And then I was remembering that I forgot about the oil that I usually put in the dough... so this time, we just had some oil sprinkled on top.

The masterpiece was then resting under cover for about an hour before going into the oven, 30 minutes at 220 degrees. The result left me with mixed feelings: On one hand it had a nice crust and a good and even inner structure. On the other hand it was missing some salt, it was missing the oil (or butter) in the dough and it certainly didn't turn out light and airy. Let's see if I'm more lucky next time!

Wednesday 13 October 2010

Today we'd like to introduce you to the Arbitrary Hedgehog Bread. I should not mention that it turned out really, really nice, because this one will be a bit difficult to put into a recipe that one could follow. Nevertheless, it makes a good story.
Let's start with stating that I had no particular plan as to what kind of bread I wanted to do. We finished with the previous one, so there was a certain urgency to do a new one. I also need to mention that I wasn't in the best mood for baking for reasons outside the scope of this blog. Usually, that would not be a good outset!
Anyway, while our zuccini and the lamb where in the oven getting ready for dinner I started measuring the flour. There was a nearly finished pack of strong white flour and a nearly finished pack of rye flour and the next thing that caught my attention was flames shooting out of the oven!
After getting the situation under control again I returned to the flour to find the electronic scales having gone back to stand-by, so I just added a bit more flour to get an amount that I felt comfortable with. Luckily I've done the sugar- water- and yeastmix earlier, so at least that was done properly measured. However, now I simply added some salt, a splash of olive oil and another splash of cider (you see what I mean by 'arbitrary'), mixed everything together, got reminded that dinner by now was ready... things were getting hectic!

All there was left for me to do was quickly (but using good old stress-releasing brute force) knead the dough, cover it and let it rest while we were having dinner. Now don't ask me how long I allowed it to rest, I estimate about 90 minutes, after which I returned to the dough for more stress releave. As a matter of fact, there was a moment it almost looked like I was trying to do a pizza, but I thought better and rolled it up to a more bread-like shape. Did some deep cuts, rubbed some thyme into the wounds and covered again while I was preheating the oven to roughly 220 degree.

The rest was fairly simple.. get the dough into the oven, wait 20 minutes, take it out, tap (sounded 'proper') and resist the temptation to sample it right away.

So, after another 10 minutes the whole ordeal was over and done, and, much to my surprise we had a good looking, hedgehog-shaped (can't you see?), gorgeous smelling bread with a subtle crust and a nice and tasty inside. maybe a hint on the soft side, but hey! You should always leave some room for improvement!

Thursday 7 October 2010

Cider Rye Loaf, not as difficult as you might think.


So finally my first post in this blog! I must admit I am a bit of a lazy writer... never really like writing essays at school and still no different, apart from the fact that I am not at school anymore.
Lately, I've been following recipes for breads since we've changed to the new yeast and they seem to work. Also I've found out that when a recipe calls for a certain amount of dry instant
yeast, you should use the double for dried active yeast.
As the bread ran out in middle of the week, it was
my turn to make some bread and I decided for a Cider Rye loaf from Dan Lepard.
Seems like rye bread has a reputation of being difficult to make but to my surprise and as the recipe stated it was pretty easy. You just need patience really :)


First you need to prepare the overnight mixture.


Next day, mix the rest of the ingredients and rest for 30 minutes.


Shape the dough in a nice ball shape and place on an ovenproof dish. Leave for 2 hours.


Put it in a cold oven, lid on and set temperature to 200C for 30 minutes. Take lid out and leave for more 15 minutes. In my case, after testing the bottom of the bread, I decided to leave for 5 minutes more.


The result is a nice moist loaf! All that and no kneading required :)

Monday 4 October 2010

A different bread for a different purpose!
Usually, we do the bread for the week for eating it at breakfast. It should be an interesting bread (who wants same-old all the time?), should go well with butter, jam, Nutella or peanut butter. Hopefully, it should last us the whole week without getting too dry or too chewy.
Now, this time the brief was slightly different: We bought clams, and we didn't want to do them with either rice or pasta, so bread was a good idea. Something that would help soaking up the sauce, too. Like a French baguette... alright, we could have just bought one, but that would be too easy, right?
I was looking up a few ideas from my cooking books, knowing that you won't be able to do a baguette unless you prepare the dough the day before. I found two interesting suggestions, one being Portuguese and the other one from Lebanon. I wonder if that is a good idea...

So, here we go: 350 grams of strong white flour, 50 grams of barley flour. One teaspoon of salt, 1 table spoon of sugar. 2 table spoons of olive oil. Extra virgin, obviously! Prepare the yeast as usual (or as per instructions), 100 ml cold water, 50 ml boiling water, 2 table spoons of sugar and 3 table spoons of yeast. I'm happy that since the last time, my yeast does behave as it should. 10 minutes in a warm place and you see it bubbling away!

Mix everything and attempt making a nice, smooth, elastic and not overly sticky dough out of it. Chances are you won't succeed, because I didn't allow for sufficient liquid. No, no beer. No cider either. Instead, I opted for more olive oil (still extra virgin and, if I may add, I prefer unfiltered). Don't ask me how much oil I added in the end, I'd say about 2 more table spoons. Once the dough was okay. I smeared it with more olive oil and left it covered to rest for one hour.
After that, I split the dough in half, as I expected we would want only half of the bread with dinner, while the other half would serve a few days of breakfast. Also, I didn't want the dough balls to be that big (as a matter of fact, the Lebanese recipe suggested splitting the dough in 12!). As you can see, the result did have some resemblance with Naam (but that would be totally different again!)
Again, rub it in olive oil (did I mention 'virgin'?) and leave it resting covered while the oven gets preheated to 230 degree. Yes, let's turn it up full blast!
Just before slipping the 2 breads in the oven I sprayed them with cold water, so the top would not turn to charcoal prematurely. I left it then in the oven for about 15 minutes and gave it another 10 minutes at about 150 degree. See, I did say in the beginning that today we were doing something somehow differently.

We do enjoy the result and it did serve the purpose brilliantly. It's soft, but not too soft, and it soaks nicely. It has a very subtle sweetness, too. And after cutting I even found a suitable name: Evil Bunny Bread. But then again, that's just me...


Monday 27 September 2010

Finally! I must admit I've grown a bit tired (if one might say so after 2 posts!) of putting in nice words what was essentially a disaster... It's all good and well to describe the ups and downs of two amateur bakers, but when you happen to be one of them, all you really want to report of are the ups!
So, finally the long awaited success story. I should have known it, though. Of course it's good the learn and to read all the wisdom you can find about bread making there is on the internet, and of course it's general knowledge that, contrary to cooking, baking is somehow a precise science... truth is, you have to trust your feelings. The numbers are undoubtedly important and helpful so you can repeat a good result, but trust me, they are not the bible!
Well, let's get it over with, shall we? Take 250 grams of barley flour, 150 grams of strong white flour. Mix with a teaspoon of olive oil and a table spoon of honey, plus a teaspoon of salt and a good sip of dark beer (in case anybody reading this thinks a 'sip' is not a precise measure, you can substitute with 75 ml). Mix all this very well as usual, while in the background, your yeast is activating itself (50 ml of boiling water, 100 ml of cold water, 2 table spoons of sugar, 3 table spoons of dry yeast). Note to myself: Try fresh yeast and see if it makes a difference!

As usual, turn all these ingredients into a nice dough (but don't exceed 10 minutes of kneading, as it might not be good for the dough or your muscles might hurt the next day) and leave it covered in a warm place for 1 hour. More or less... I actually did end up leaving it for 3 hours, by then it did rise a lot!
Before turning the attention to the dough again, we prepared the 'twist': 1 fine chopped fig (we used a fresh one, but I have the feeling a dry one would be even better) and a handful of dried mushrooms, porcini for example. We did went mushroom picking 2 weeks ago, and we dried a big pile of boletus (the same family as porcini). Obviously, using self-picked mushrooms does improve the bread. Use enough of them, though, so they complement the fig!
I kneaded the dough a second time, stretched it out a bit, spread the fig and mushroom mix, rolled it and twisted it... as usual, use your imagination! A bread should not just taste good but also look pleasing to the eyes...
So, here's the verdict on the result (after letting the dough rest for another 40 minutes before putting it in the oven for 20 minutes at 210 degree: A nicely balanced (not too soft but also not a brick) loaf of bread with a good rustic crust and a moist but not too wet inside. The figs ad texture and fruitiness while the mushrooms enhance the overall flavour and add subtle complexity... sounds fairly convincing, don't you think?

Monday 13 September 2010

Every heard of the saying 'third time lucky'? Well, it doesn't always apply....
Having said that, we have been fairly successful picking mushrooms (milk caps and ceps, but I won't go into greater details here) in the New Forest. We dried quite a few ones and had pasta, quiche and scrambled eggs; a true mushroom bonanza!
And then I turned my attention to bread making (as Ana was busy with the quiche). Things were looking promising! For the first time, the yeast was doing what a yeast is supposed to do when you activate it. It bubbled and the surface became frothy. I mixed 50ml of boiling water with 100ml of dry cider, dissolved 2 tablespoons of sugar and then added 3 table spoons of yeast. Cool. (It seems to work, but since then Ana told me that alcohol doesn't just affect people, it also makes yeast sluggish.)

In the meantime, the following ingredients came together: 200g of white strong flour, 200g of rye flour, a good share of butter, a table spoon of maple syrup, a tea spoon of salt. Nothing that would give reason to believe that problems were imminent.

Mixing everything together I soon started realizing that the dough was a bit tougher to knead than other doughs before, but I wasn't worried. Actually, we both started worrying that after one hour of resting in a warm place (the usual way), it didn't rise. Okay, it did rise, but that was by far not the double size we wanted to see. So we gave it another 30 minutes, and it did look a bit better.

Now came the second time kneading and then it went into the oven for 20 minutes. Now, while usually when things go wrong you might start puzzling and creating theories why the result didn't match the expectations, this time I did make an obvious mistake, which added to the shortfalls of the finished bread:
Our oven is a product of rather strange ingenuity, there is a little switch in the door, so when you leave the door open a bit, it switches to the grill-function. Luckily, the mistake was soon discovered, as the top of the bread was turning black-ish and a slightly alarming smell reached our noses. Then the door was closed and the bread continued baking the way it was intended.
So, what was the outcome? The bread does actually taste surprisingly well and it does look pretty rustic. It also looks rather solid and very flat, which is a bit of a giveaway that things are not quite right. The crust is... well, edible. But only just, and you'd need strong teeth.

What will we do differently next time? First, never grill a bread. It's not a t-bone steak. Second, better drink the beer rather than trying to intoxicate the yeast. Or add it later. Third, rye is a difficult type of flour. Rye bread is wonderful, but when it goes wrong, it really does go wrong.

Nevertheless, I'm looking forward to our next bread. It's got to be better!

Sunday 5 September 2010

Alright, let's start with a picture illustrating what I was saying last week about bread in Norway. We were told that this was the best bakery in Oslo. We didn't stop there, so we just have to believe it, fact is, it looked very good through the window!

Now, for this week, we have to report some major drama... it started all so well! Last week there was a really interesting program on TV, called 'The Great British Back Off'. They were doing bread this time, so we watched and took mental notes. Not that our bread has been bad so far, but of course we're always ready to learn and improve. It's all about the yeast, the temperature, the amount of sugar and salt (that's possibly the reason why I like to be rather vague about those amounts, so nobody can claim that I was giving wrong instructions!)

So, here we are, and this time we tried to do it really 'proper' according to what we learned. Preparing the yeast with the right amount of warm water (1/3 boiling and 2/3 cold) and the right amount of sugar. Keep it in a warm place for about 15 minutes... the surface should froth, but maybe the bubbles where still there from the whisking? I don't know...
Nevermind, I got 400 grams of white flour, 2 teaspoons of salt, a dash of olive oil. Added some nice ale from Dorset to get the amount of liquid right (approx. 150ml for preparing the yeast, so we needed another 100ml, more or less). Now, one thing I seemingly always did wrong was that I worked the dough just roughly in the beginning and thoroughly after the 1 hour rest, in which the dough size should double. Okay, if that was wrong, let's see how it done right: Work the dough thoroughly, cover with a wetted tea towel and leave in a warm place for an hour. Guess what, it didn't rise! Something was not going according to plan, but we ignored the warning signs, kneaded the dough (that is to get the non-existing air bubbles out), let it rest for another 30 minutes, in which it didn't rise either.
Oh well! Still put it in the oven and 20 minutes later we had a lovely looking brick. Crust was not too bad, it sounded right when tapping, but when we cut it, it was practically raw dough inside. What a disaster!

Anyway, today we started all over again, used more yeast, more sugar. Warmed the ale before subjecting the yeast mix to it. To cut a long story short: The result is better. If that doesn't sound too enthusiastic it's because I'm not convinced. The dough did rise, but far from what it was supposed to. The bread stayed fairly compact, at least it looks really interesting! So, we did cut, we did try. Not too bad. Actually, it is better than expected. But the next time I'd like to see something more convincing... or is our baking career grinding to a hold? I hope not!


Tuesday 31 August 2010

I guess one cannot call a blog a blog if it consists of only one post. Luckily, a bread won't last forever and one has to do another one.
In the meantime though, we also have been travelling, and we enjoyed some really nice bread and some great cinnamon swirls in Norway, on which I really should elaborate a little bit more. The only bread I didn't find too convincing (but I would need to test more to say if that is typical or just bad luck in 2 occasions) was the bread they use for sandwiches, which is thick cut and soft. Apart from that, I do have to say the Norwegians know a thing or two about bread!
But back to our own 'project of the week':
We took 300 grams of spelt, approx. 100 grams of strong white flour. 2 table spoons of honey, 1 teaspoon of salt, 1 teaspoon of olive oil. 1 dried & smoked chipotle chilli and one fresh green cayenne chilli. One teaspoon of spanish paprika powder. Mix all well...


If you think the yeast is missing, wait! Here it comes, but this time we used 'proper' yeast, so we had to mix it with hot water and some sugar (follow the directions on the tin) to 'activate' the yeast.

Once that's done, after 15 minutes, add this to the dough mix and knead it into a nice looking dough.
let it rest for 1 hour in a warm place, covered by a wet tea towel, then take it out and work it well before putting it back to rest for another 30 minutes. Make some cuts to the surface (I choose a wavy pattern this time, but that of course is artist's licence) and then it goes into the pre-heated oven (210 degree) for 20 minutes. Actually, though it was already nice and crispy on top, the bottom was still a hint soft, so we gave it another 5 minutes. And this is the result...


The bread turned out to be as expected pretty spicy, and it's particularly nice with either butter or Nutella... I guess that combination is slightly reminiscent of the Mexican 'Mole'...

Sunday 22 August 2010

Into The Deep End

The idea was brewing already for quite a while, but as these things are, it takes a bit for getting started. We were doing our own bread week after week, and I was dropping one or the other picture on facebook, but that was it. Somehow, however, it occurred to us that our bread was not just turning out nice but also popular amongst those who tried it. In other words: why not blog about it?
This was easier said than done, as this meant that we had to agree on a name of the blog, a font, a style. Pictures or no pictures, decisions and more decisions. And nothing was posted and a few breads went by un-documented.
So, in order to get started with something (and leave any question and introduction for later) let's start by diving into the deep end: we decided to do a rice bread. Or rather, a bread containing a certain amount of rice flour. This is a tricky one; I am aware that we should have started with something more 'standard', as certain 'standard rules' repeat themselves, thus it would be easier to explain them once and them keep referring to them. Well, need to keep that idea in mind for the next time.
After doing a bit of research online we had a rough idea as to how it might work out. So here's the 'recipe'. I'm a bit mean though, I'll tell you the recipe and then I'll tell you 'don't try this at home, unless you have a fairly good understanding of bread making'. The reason is that normally we will tell you the exact amounts of ingredients. Today, we can't...

Take 90 grams of rice flour and mix them with boiling water until you get a kind of 'paste' of satisfactory consistence (that is sufficiently vague, isn't it?)
While this cools down, mix approximately 200 grams of white flour with one satchel of yeast, 2 spoons of sugar, a good pinch of salt and a teaspoon of oil. Then you can mix the rice paste into it.

The next step is equally vague (I promise, things will get better!): Flour your hands and try to work this mess into an even dough! That is easier said than done, as the rice will make this dough very, very sticky. I would say that in this case I must have worked in probably another 50 - 100 grams of white flour until a consistency was achieved that was promising.


From here onwards it was pretty 'standard': Cover the dough with a wet cloth, let it rest in a warm place for about 1 hour. Take out, knead again, but on a baking tray and leave covered in the same warm place for another 40 minutes. After that, it goes into the pre-heated oven at 210 degree for 20 minutes... well, set the alarm for 20 minutes, look, knock on the bottom and when it sounds soft (i.e. dull) then in it goes again. Ours took in total 30 minutes, and this is the result:


Once you take it out of the oven, let it cool down on some sort of grill so it doesn't get soggy. Also, it's a good idea to wait a little bit before trying...

Given the experimental nature of this bread we are delighted with the result. It has a crispy outside and a soft and rather dense inside, which I hope should not dry out too quickly. The taste is very delicate as well, the rice is noticeable but not overpowering.

Now, the first post has been done. There's a bit of catching up to do, as we intend to write something about the breads we have done in the last 3 weeks as well. Please, watch this place: in the future we hope we will have enough self discipline to post all our breads and other projects that involve doing a dough, such as the odd cake or cookie. Or a pizza...